Navigating the vast and treacherous Lands Between in Elden Ring presents players with a dizzying array of choices, especially when it comes to equipping their Tarnished character. Among the most crucial decisions is the selection of Talismans, powerful trinkets that can drastically alter a build's effectiveness. Scattered across the world are hundreds of these items, each offering unique boons such as increased damage, enhanced health pools, greater magical potency, or improved defensive capabilities. However, finding the right Talisman is only half the battle; players must first embark on perilous journeys to locate them. One such artifact, renowned for its formidable defensive properties, is the Pearldrake Talisman +2. Acquiring it is no simple task, requiring the unlocking of hidden regions, the conquest of mighty foes, and the solving of intricate puzzles, making it a true test of a player's dedication and skill.
The journey to claim this powerful talisman begins with accessing the Altus Plateau. This elevated region is sealed off from the early game areas, and the key to entry lies in the two halves of the Dectus Medallion. The first piece is located in the foreboding, scarlet-tinged lands of Caelid, specifically within the walls of Fort Faroth. The second half awaits in the more familiar territory of Limgrave, guarded within Fort Haight. Once both medallion halves are secured, the path leads to the Grand Lift of Dectus. To reach it, travelers must start from the Main Academy Gate Site of Grace at the Academy of Raya Lucaria. From there, a magical transport mechanism to the north carries them across a chasm to a landmass opposite a broken bridge. A northern trek along the path finally reveals the grand structure of the lift itself, where presenting the complete Dectus Medallion activates the mechanism and ascends the player to the golden fields of the Altus Plateau.
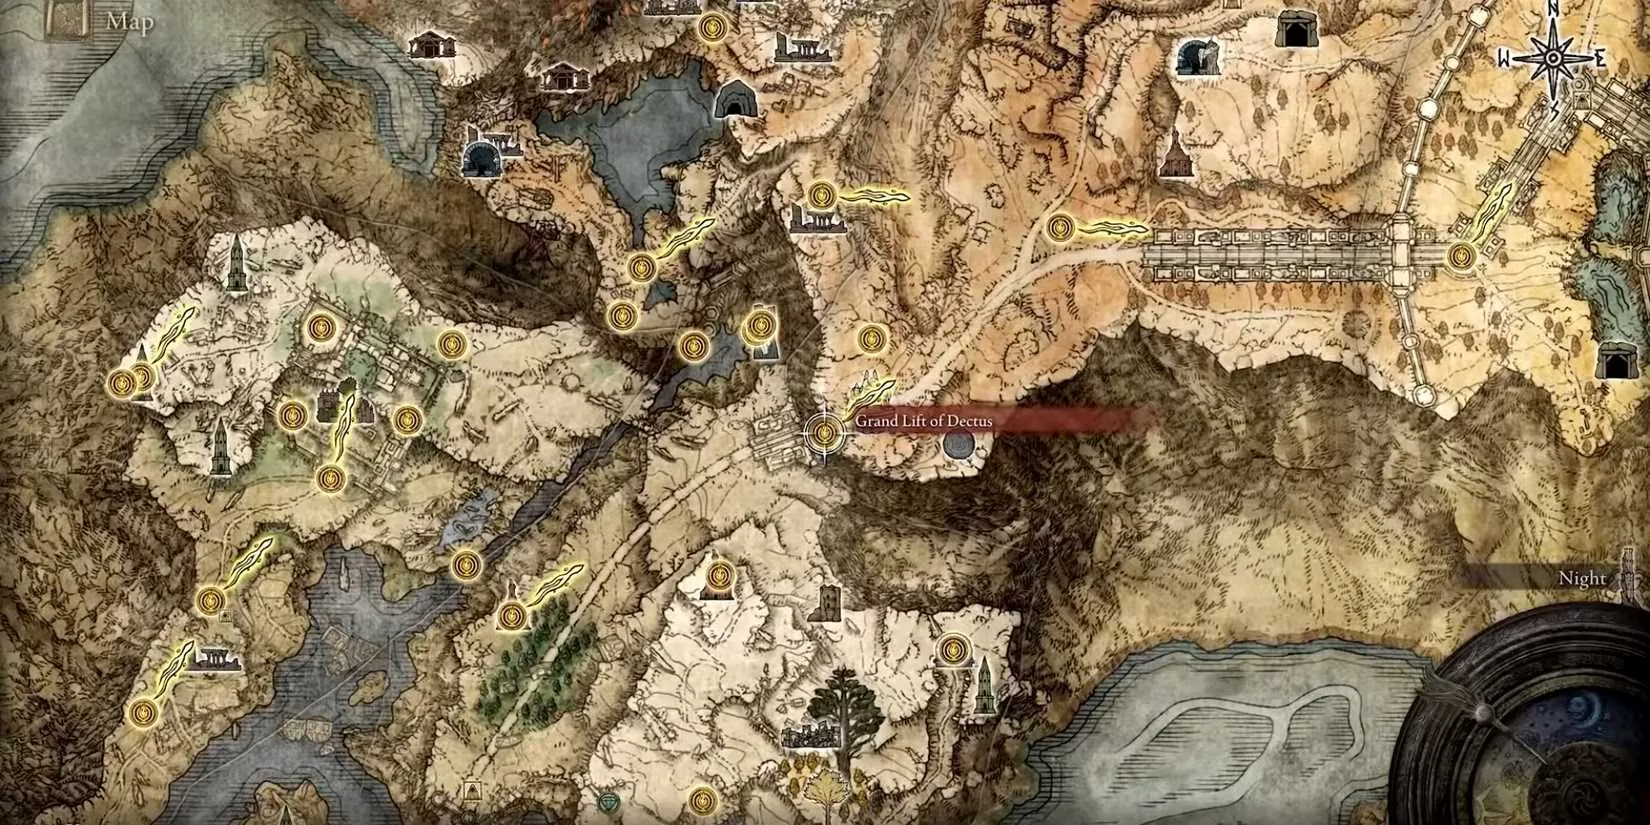
Reaching the plateau is merely the first major step. The Pearldrake Talisman +2 itself is hidden in one of the game's most secretive and challenging late-game areas: the Haligtree. To get there, players must first procure the Haligtree Secret Medallion. This endeavor requires progressing through the main storyline by battling through the Royal Capital of Leyndell and defeating its shardbearer, Morgott, the Omen King. His defeat triggers a meeting with Melina, who bestows the Rold Medallion upon the Tarnished. This key item allows access to the Grand Lift of Rold, located northeast of the capital, which transports the player to the frigid and dangerous Mountaintops of the Giants.
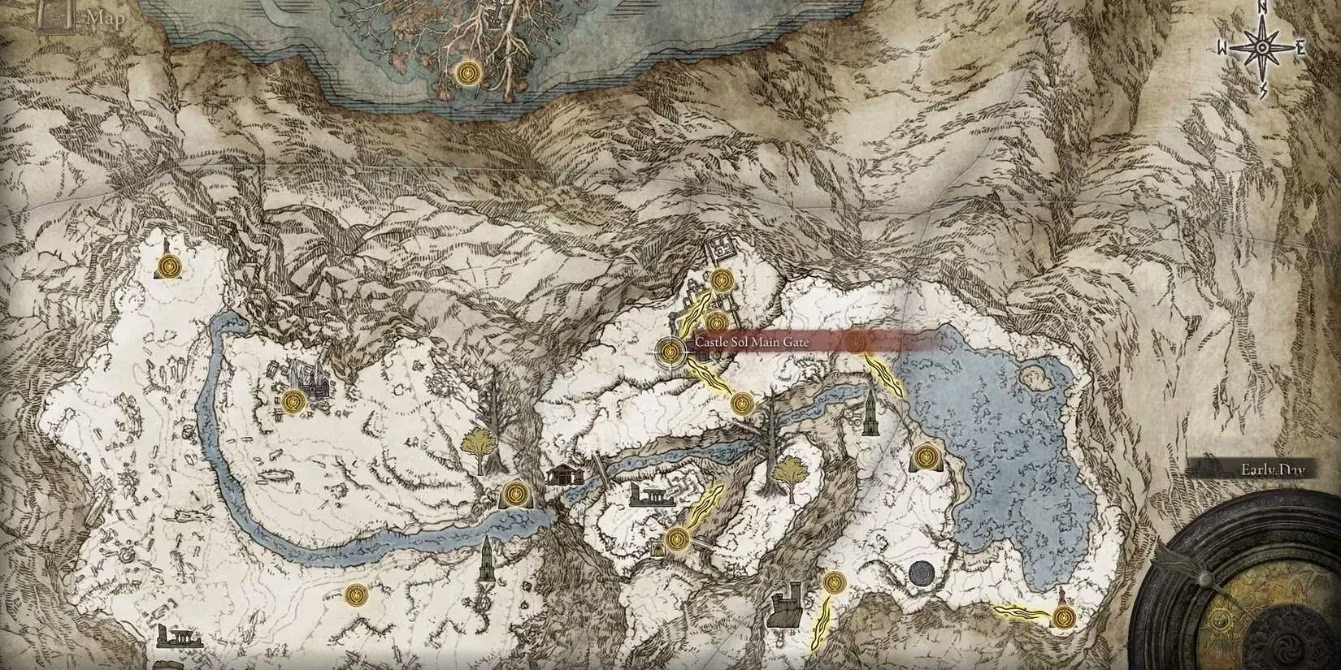
Upon arriving in this snowy wasteland, the next destination is the formidable Castle Sol. Perched in the northeastern part of the mountains, this fortress is guarded by powerful spectral knights and other deadly inhabitants. The left half of the Haligtree Secret Medallion is found at the summit of the castle's highest tower, a reward for those brave enough to conquer its defenses. The right half, however, is located in a much earlier and more deceptive location. Players must return to Liurnia of the Lakes and seek out the Village of the Albinaurics Site of Grace in the southwest. Here, in a shadowy corner, sits an inconspicuous pot. Shattering this jar reveals the NPC Albus, who entrusts the Tarnished with the right half of the medallion.
With both halves in hand, the player must return to the Grand Lift of Rold. This time, raising the Haligtree Secret Medallion (instead of the Rold Medallion) causes the lift to descend, rather than ascend, revealing a hidden path to the Consecrated Snowfield. This optional, brutally cold area is a prerequisite for reaching the Haligtree. From the Snowfield's starting point, a trek north leads to Ordina, Liturgical Town. This location presents a unique and challenging puzzle involving spectral assassins and lit braziers that must be solved to activate a teleporter. Successfully navigating this trial finally grants passage to the Haligtree itself, a massive, crumbling arboreal city shrouded in mystery.
The final leg of the quest begins upon materializing on a great branch within the Haligtree canopy. A careful descent through the intricate network of branches and structures leads down to Haligtree Town. After resting at the local Site of Grace to prepare for the coming confrontation, the path leads northwest through a doorway. Directly ahead, a ladder awaits. Climbing it brings the player to an open area teeming with hostile creatures. This lofty platform is defended by a horde of enemies that must be cleared. Furthermore, a large and powerful foe patrols a platform to the southeast; this adversary must also be defeated to safely proceed.
-2-9-screenshot.png?q=49&fit=crop&w=825&dpr=2)
Once the area is secure, the player should jump onto the southeastern platform where the large enemy was stationed. At the far end of this platform lies the ultimate prize: a corpse holding a gleaming item. Looting this body finally awards the coveted Pearldrake Talisman +2, the culmination of a long and arduous journey spanning multiple regions and boss encounters. The sense of accomplishment in securing this item is matched only by its potent utility.
-0-41-screenshot.png?q=49&fit=crop&w=825&dpr=2)
The Pearldrake Talisman +2 is a treasure depicting a trio of pearlescent ancient dragons. Its in-game description reads: “Talisman depicting a trio of pearlescent ancient dragons. Vastly boosts non-physical damage negation. The ancient dragons, who ruled in the prehistoric era before the Erdree, would protect their lord as a wall of living rock. And so it is that the shape of the dragon has become symbolic of all manner of protections.” This description is not mere flavor text; the talisman provides a substantial 9% reduction to all non-physical damage. This includes elemental damage types such as:
-
Magic 🧙♂️
-
Fire 🔥
-
Lightning ⚡
-
Holy ✨
It is important to note for build optimization that the Pearldrake Talisman +2 cannot be stacked with its weaker variants (the standard Pearldrake Talisman or Pearldrake Talisman +1). However, its effect is complementary to other, more specialized defensive talismans. Players can effectively combine it with items like the Haligdrake Talisman (for holy damage negation) or the Flamedrake Talisman (for fire damage negation) to create layered defenses against specific elemental threats. For any Tarnished facing the myriad magical and elemental assaults of the Lands Between's later challenges, from the spells of sorcerers to the breath of dragons, securing the Pearldrake Talisman +2 is an investment that pays dividends in survivability, making the exhaustive quest to obtain it well worth the effort.